Saturday, February 22, 2025

7.1: Project plan

Timeline

Feb 21-March 1:
-construct base 
-make mold for/pour the face
-design window inset
-design clock hands

March 2-8:
-fabricate clock hands, window inset
-get switch mechanism and code working
-develop installation output

March 9-15:
-troubleshoot
-create digital installation output


I started thinking that my lightbulb/lamp sculpture idea was too literal, so I designed another object that creates a similar experience but with more symbolic interest and richness. 

I'm most interested in the affect of sunlight inside interior spaces; also in the gradually shifting position of the sun in the sky by hour, day, and season as related to apparently stationary architectural planes like windows. I want to make a device that captures the sun's placement in the sky at a specific location which is then able to be brought inside to become a part of an installation. I'm still not sure on what the result of the data in the installation should be, so for now im focusing on constructing the portable object.

Iterating through ideas:


Design for the object (second page by Prof. Duarte):


The object will be a handheld circular object that references construction and home materials. The circular base will be made of wood, and the face of it will be made of a reinforced plaster.
I will include a small window-like inset on the front with a mirror to reflect light behind it; and a door handle on the back as a grip. The device will have two modes: capturing, which records location and time, and displaying, which causes effects in the installation. 

What switches the modes will be a clock hand on the face of the object that resembles a clock hand. Mode changing will be triggered by switches underneath the plaster. 


Saturday, February 15, 2025

6.2: Project updates

The two electronics I've purchased for the project are this GPS module:

https://www.amazon.com/gp/product/B084MK8BS2/ref=sw_img_1?smid=A2QTZX14X1D97I&psc=1

and this microcontroller: https://www.amazon.com/dp/B0B94JZ2YF?ref=ppx_yo2ov_dt_b_fed_asin_title&th=1

I'm thinking that I want to use something like ComfyUI (an AI-image/video generating program that runs locally) to generate the visuals to be projected onto the lampshade. ComfyUI uses flow programming like Touch Designer does, so I found it easy to navigate the interface without as much of a learning curve as there would have been otherwise.

I'll want to use API data to get weather, lighting, and location data to determine the generation of visuals, but for now, these are examples of some images I generated with one of the pre-downloaded safeTensor checkpoints.

For the purpose of this project I will want to figure out how to (if it's not too steep of a project) create my own sort of image library for the AI to draw from when generating images. I don't want my projections to read as AI images, so narrowing down the aesthetic of what the generator draws from will be important. 

ChatGPT is my initial stop for gathering information on the different steps required to make geographic location data eventually turn into a generated image. Here is the code it suggested for having an API cause effects on ComfyUI: 


 What I need to solve next is how ComfyUI can interact with Touch Designer and the electronics I've ordered. 

6.1 Going in-depth with Touchdesigner

Touchdesigner tutorial: https://youtu.be/qbupHTeJCeU?si=RNrKQOkRDrGAqVKa

TOP operators:


Lookup: allows us to change colors/have manual control over colors


Edge: outlines the edges of shapes in a previous operator

Transform: applies 2D changes to an image

**You can select all layers and change the resolution of all of them under the "common" tab


Noise: a data-generating operator

Displace: can be combined with data operators like "noise" to create mathematically-determined displacements/transformations of images

Level: changes brightness and contrast

HSV adjust: changes hue/saturation values

Crop: crops any output image

Movie file in: allows any video file to become a part of the generated images (in the screenshot above, it's the banana)

Tile: multiples the image

Mirror: flips images at different angles

Cross: combines images with a customizable ratio

Switch: blends from showing one input to the next (good for making animations that change over time)


CHOP operators

CHOPs get data from elsewhere to be input into Touch Designer: data can be used to drive other parameters.

Math: helps to remap the range of our inputs to be suited for their specific purpose in the next step of the program.

Null: allows networks of nodes to be closed properly so that the data can be used in the next section of the program


Pattern: produces different mathematical patterns that can be used to control other operators

Beat: acts as a timer that rests on a regular beat, allowing it to be used as a pace-keeping inpup

Lookup: combining lookup with beat and pattern (or other chops) to return the value of where the pattern is at:


**making sure the index ranges of chops that work together match up is important.

Lag: slows down rapid changes in input channels (for example, it makes animations cleaner)

Filter: smooths or sharpens input channels

COMP Operators:

COMP operators contain their own networks. COMP is short for component

Base: allows for a whole network to appear as a single operator in a larger network

In: used to create a TOP input within a COMP: (here, sop_tutorial is the COMP)


SOP operators:

SOP operators are surface operators; you can create, import, and modify 3D geometries with them.

Merge: combines 3D shapes

Transform: changing translation, rotation, scale; you can use them to make a 3D scene.

Noise: morphs shapes across time.

Adding images to the surface of COMPs requires:

    Camera COMP: acts like a real world camera to film your point clouds in pixel format

    Light COMP: casts a light in a scene

    Geo COMP: turns a geometric scene into a COMP

    Render TOP: renders all 3D objects as pixels


DAT Operators:

Text: allows the editing of freeform text; can also be used for writing and executing python scripts

    to run a script, right click on the text box and hit 'run script.'

    text boxes and global and do not correspond to a specific module

"members" in python return parameters/information about operators

use the Python TD documentation to create scripts for specific purposes

COMP Operators:

slider COMP can be send to a null to control the parameters of another operator

if you have a network of multiple operators you'll use repeatedly, drag them into a base COMP to be able to use them as a single operator

Working with Audio:

Audio file in CHOP -> Audio device out CHOP plays an audio file.

you can use data occurring in an audio file to affect other parameters

    Audio spectrum -> Analyze: outputs a single number to the channel

    tools -> audio analysis -> null: another way to have audio data cause change


Saturday, February 8, 2025

5.2: research directions for project development

I have begun to think about the electronics that will be required to make the different functional aspects of my midterm sculpture happen.

My basic idea is to have a lightbulb that can be taken outside, triggered, capture data about the lighting in the surrounding environment, and then be screwed into a lamp. When installed in the lamp, the bulbs presence will cause a one-time, short projection made of aspects about the outdoor light such as time of day, weather, and how it interacts with materials on the land.

I'll need GPS data that can then be used to gather data from weather sites, Google Earth, and other similar sites. I will also need to capture the time of day. I would like for the sculpture to only function outside, so I want to experiment with ways of detecting differences in sunlight and indoor light. One way might be to detect the 60 Hz frequency of indoor light as a condition that would stop the device from working.

I am planning to work with this GPS module: https://www.makerfocus.com/products/gt-u7-gps-module-compatible-with-51-microcontroller-stm32-arduino-uno-r3-and-ipex-antenna?srsltid=AfmBOopqxaREoRw_Pc7hdSxEhVwrF1oE2nS-ZlAkWYBiUAIUZ1aDpHSc

    I could use this module with an arduino, an ESP32 microcontroller (with wifi, which might make communication to the projector in the lamp possible), or this microcontroller option: https://www.amazon.com/Seeed-Studio-XIAO-ESP32C3-Microcontroller/dp/B0B94JZ2YF?th=1

In addition to the technology inside the bulb, I will be experimenting with how to cast a 360-degree projection on the lampshade from within the lamp. A combination of digital projection and potentially mirrors, prisms, or lenses will be my starting point. I may also have to consider projection mapping from a location outside of the lamp.


5.1 working in touchdesigner

This week we worked with outputs created by an arduino that create effects in touchdesigner and outputs from touchdesigner generators that cause effects on the arduino.


This program reads a voltage from a potentiometer and sends it as a value from 1-255 using the Serial.write function (which sends the number as one byte of data as opposed to serial.print, which sends each numeral as an individual byte).


By selecting the USB port the arduino is connected to in the 'port' subsetting of a Serial DAT, the values created by the arduino can be used as inputs within a touch designer program. The network below has the serial number coming in, being sent to a 'data' node through the python code connected to the 'serial' node, being converted to a degree value in the 'math' node, and then sent to a null to have an effect on the movie file. 

this code sends the serial number to the data operator:

    def onReceive(dat, rowIndex, message, byteData):

op('text1').text = int.from_bytes(byteData, "big")
return


Conversely, we can also generate data inside touchdesigner that has an effect on a physical arduino device. For example, this slider can be combined with a math (for conversion) and a null node to send data to a PWM pin to control the brightness of an LED.

For this example, the pre-set LED brightness example in the Arduino IDE will work.

Instead of receiving serial data from the arduino, this python script allows serial data to be sent to the arduino, which controls the brightness:


def onOffToOn(channel, sampleIndex, val, prev):

return


def whileOn(channel, sampleIndex, val, prev):

return


def onOnToOff(channel, sampleIndex, val, prev):

return


def whileOff(channel, sampleIndex, val, prev):

return


def onValueChange(channel, sampleIndex, val, prev):

op('serial1').sendBytes(val)

return


Saturday, February 1, 2025

4.4: midterm project new idea

The idea I've chosen to move forward with focuses on the unique affect of light in the outdoors. The first component is a sculptural lightbulb-like object that when taken outdoors and "activated" in some way (by button press, twisting into a special socket, etc) captures data about the natural light in the location where the user stands. I might gather data by actually sensing light or using a camera, or I might use geographic data to pull images or data for visualization from the internet. I might use a combination of both.

The lightbulb (lightsculp?) can then be brought inside and screwed into another sculptural object-- a lighting fixture of some sort. Right now I am envisioning a very typical lamp shape with a white shade. When the bulb is fully screwed into the lamp, a 360-degree projecting generated from the outdoor light will be cast onto the lamp.

The 360 projection will present technical challenges that I am curious to solve. By our Tuesday class, I will have meditated further on what the aspects of this project signify. A clearer and richer exposition of concept will guide my aesthetic choices for these sculptures.


4.3: labs on digital and analog inputs

 Lab 4: analog input

1. reading voltage through analog input

This circuit connects an analog input pin to a source of power so that the voltage can be read:


This program receives the voltage as an integer. Because the integer variable type has a maximum value of 1023, the reading comes through as a fraction of that number that is proportional to whatever fraction of the max possible voltage (5 here) is connected.

The second program shown converts the reading to the actual voltage by using a formula. Note also the more complex print output, which now includes strings and the additional Serial.println function, which causes the next printed output to be on a new line. 

2. Potentiometer

A potentiometer functions as a resistor whose value can be changed using a knob. This program and wiring setup allows the brightness of an led to be changed by turning a potentiometer.

the analogWrite() function has (pin number, 8-bit value) as inputs. Here, it is sending a brightness value to pin 9 that is determined by how many volts the potentiometer emits. We must divide the value by 4 because we are converting a 10-bit value to an 8-bit one.


analogWrite() works by turning the pin on and off rapidly, which can simulate a range of voltages even though the voltage is really constant. This is called Pulse With Modulation (PWM), and only pins marked with a "~" on the board have PWM capabilities.

3. Speaker

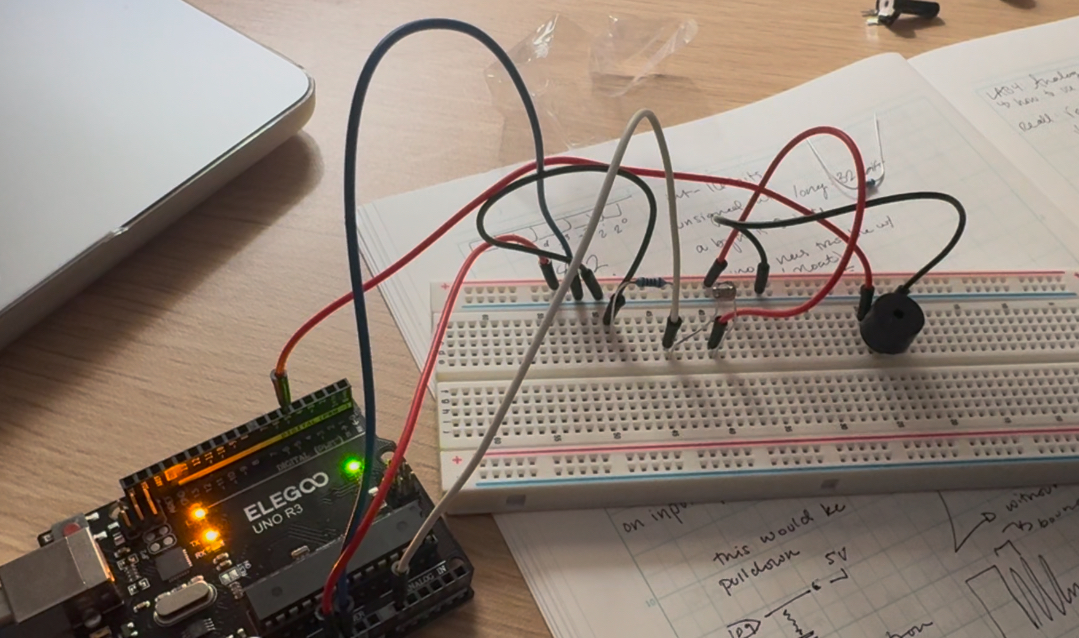
This program converts a power reading from the photoresistor (in my case 9-41) to a value that is within the rage of the speaker (200-1000) using the map function. The map arguments are (variable, min1, max1, min2, max2) where the first min/maxes correspond to an input and the second min/maxes represent the desired range of the converted value.


After completing the conversion or "mapping" program, we can then make changes in the photoresistors reading cause changes in the tone of the speaker using this code:

const int speakerPin = 5;
int lastSensorValue = LOW; // sensor's previous value

int threshold = 800; // an arbitrary threshold value

void setup() {
  Serial.begin(9600);
  pinMode(speakerPin, OUTPUT);

}

void loop() {
// read the sensor:
int sensorValue = analogRead(A0);

  // if it's above the threshold:

if (sensorValue >= threshold) {
// check that the previous value was below the threshold:

if (lastSensorValue < threshold) {
// the sensor just crossed the threshold Serial.println("Sensor crossed the threshold!"); tone(speakerPin,300,250); // beep for 1/4 second

} }

  // save current sensor value for the next comparison:
  lastSensorValue = sensorValue;
}


This program works by creating a variable to store the reading previous to the current instant in, checking if at the current instant the reading is above a certain threshold, and then issuing a beep if the previous reading was not also above the threshold. The second if statement is what allows the beep to be caused by a crossing of a certain number instead of beeping at all times that the reading is above the number. 

Note that a const is short for constant and is a variable type used when unchanging number data is being used in a program.

Lab 5: digital input

1. Ultrasonic proximity sensor

The use of libraries helps us to use more complex functions of the arduino without needing to write individual programs every time we do so. Libraries shorten these kinds of programs into simpler language that can be implemented in our programs. An example of using a library is with out ultrasonic sensor, which sends out a noise, waits to sense an echo from it, records the duration of the echo if it is present, and converts that time value to a corresponding distance.

Libraries can downloaded by clicking the icon of books in the Arduino IDE left menu bar. 

Here is an example of the ultrasonic sensor's data being used to create a visualization in a p5.js site:


2. LCD display

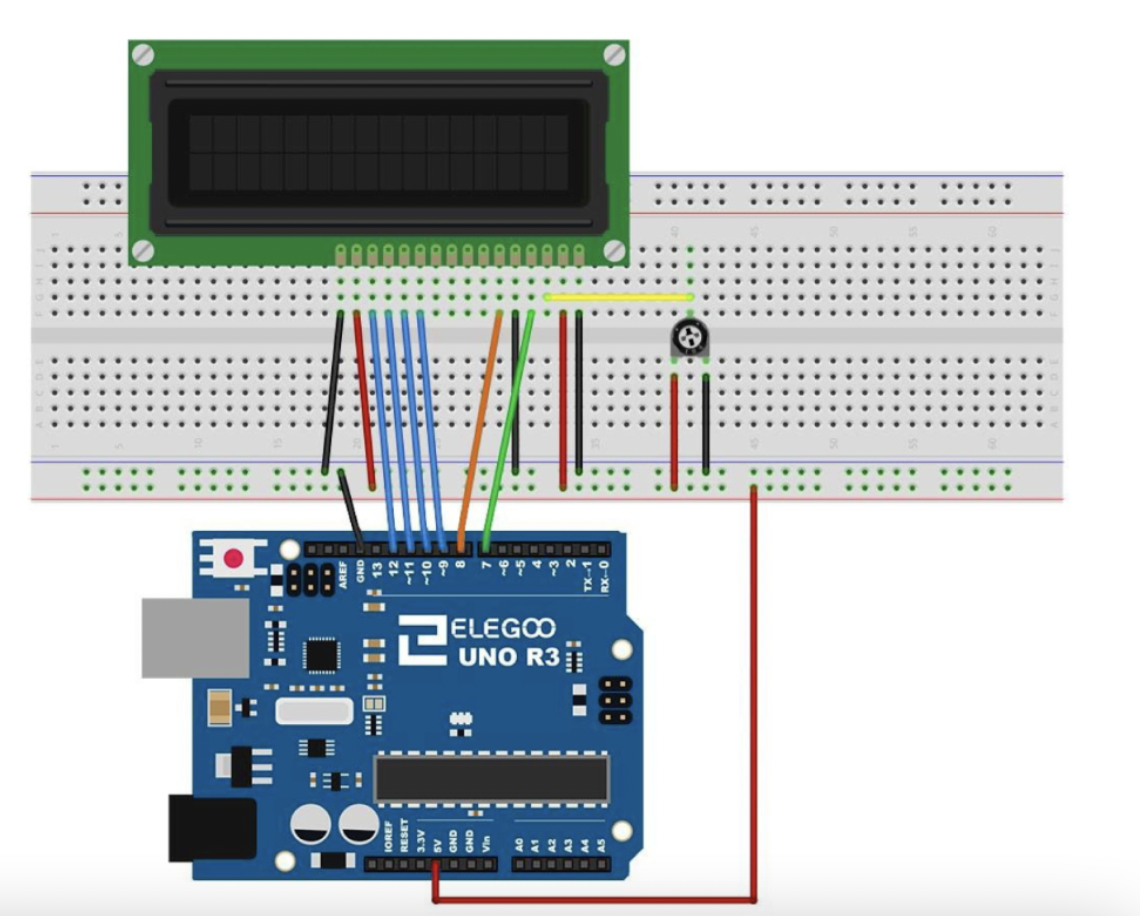
Using this wiring setup with a library for LCD screens, we are able to print text on an LCD screen with contrast that is controlled by a potentiometer. A humidity sensor enables us to prent temperature and humidity data onscreen; this shows that the possibility is open for us to convert numerical or other sensory data into corresponding but completely different outputs.


4.2: touchdesigner intro

Touchdesigner is a software to develop interactions between electronic/digital media and objects based in time. It uses flow programming, meaning that instead of creating programs with textual language, networks of symbols that represent causes and effects are connected through nodes. 

To add a node in touch designer, double click or hit tab.

Boxes that represent the aspects of the relevant causes and effects in the project are called generators. They are organized into categories within the software:

    TOP: texture operators

    CHOP: channel operators (which relate to 'flowing' data that might emerge from sensors or functions)

    SOP: surface operators

    MAT: materials

In the menu that contains all of these categories, darkly shaded boxes are generators, which create data themselves, and lightly shaded boxes require a form of input.

Palettes are pre-made networks that allow the manipulation of certain complex tasks without the need to create a mechanism for doing so from scratch. 


4.1: additional electronics basics

There are several different voltage-in (positive) pins on the arduino: 3.3V, 5V, and Vin. 3.3V and 5V adjust the voltage configuration of everything to be that number, and Vin will adjust the configuration to whatever level the power source coming in is. 


There are different ways to arrange multiple batteries to achieve different voltage outcomes.


This method is called putting batteries in series:


The outcome of this series arrangement is that the two 1.5V batteries combine their power to yield 3V. 


Another method of arrangement is to put batteries in parallel


This method yields 1.5V, the same as each individual battery. The purpose of using this method would be to have the same voltage but make it last longer.


Passive components of a circuit of a circuit include resistors, capacitors, and diodes. Passive means they can only 'process' power; they aren't capable of generating it alone. 

Resistors restrict the flow of current (current is measured in amps)

Capacitors almost act like mini-batteries. A metaphor to illustrate them is having a bucket for water with a small hole in the bottom. Even if you were to pour water (current) in the bucket inconsistently, water would flow from the smaller pinhole at a constant rate. 

The resistor and the capacitor work together when the resistor slows the flow of electrons and the capacitor allows them to accumulate at a certain rate. This allows power to be given at a certain 'tempo.'

A diode stops the flow of current in one direction. An LED is an example of a diode, it stands for "light emitting diode."


We must also distinguish between two types of data.

All components of a digital data set are one option of a limited set of measurable states. For example: on/off; 0/1/2/3/4/5/6, RGB color system, etc.


The components of an analog data set are infinite in quantity and scope of possibility. 


When coding for arduino (C++) specifying the type of variable is necessary because it dictates how many bits of data you can store in the variable.

int: 16 bits of data / unsigned int: 32 bits of data (prefixing 'unsigned' eliminates negatives and doubles capacity) / bool: true or false / const: an unchanging number


Note to avoid using decimal (floating point) numbers in any of our programs because our boards can't handle the math well.


There are different types of pins on our boards

    GPIO: general purpose input/output; which is able to take in or export signal

    Analog read: pins that only intake analog data


A floating pin occurs when a pin is not attached to volts or ground.


Sometimes, when buttons are pressed, there will be multiple readings that occur even though only one press has happened. This is due to bouncing, the leveling off of power that occurs as the pin changes from a HIGH state to a LOW one. To remediate functional issues caused by this, we might account for the minuscule time frame where the bouncing occurs in our program. 


A model of bouncing:


13.2: motor labs

  1. Using transistors to turn things on and off (first LEDs, then motors).  -Transistors help with switching power to devices that require...